Render Passes
Render passes, often referred to as AOVs (Arbitrary Output Variables), provide a way to render the final output into a set of separate shading elements that describe various aspects of the scene, such as direct and indirect illumination, reflection types, ambient occlusion and many others.
Render passes give a more precise control over the rendered image for compositing and postwork. They provide a cheaper alternative to re-rendering the entire image if only minor changes are needed — such as tuning the lighting, changing the scene background or adjusting colors. In such cases, it is more efficient to modify isolated passes using your favorite compositing software, and then recombine them to get the final beauty image.
Beyond that, render passes can help you achieve effects that would otherwise be difficult or even impossible in physically based rendering.
Including Passes in the Render Output
To save render passes into a single EXR file, follow these steps.
Step 1. Select Passes to Render
Select one or more passes to include in the final render:
Make sure that AMD Radeon ProRender is set as the active render engine in Maya.
For details, see Switching to Radeon ProRender for Maya.
Open the Render Settings window.
To do this, from the top menu, select Radeon ProRender > Settings. Alternatively, click the Display Render Settings button on the main toolbar or in the Render View window.
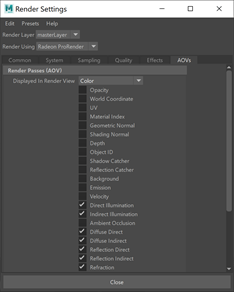
Switch to the AOVs tab.
In the Render Passes (AOVs) section, select passes that should be created along with the final image.
Note that more passes give finer control over the image but require more render time, memory and storage resources.
Step 2. Select a Pass to Preview
By default, AMD Radeon ProRender displays the Color pass when you render an image in the Render View window. To render a different pass through the render viewer, select it in the Displayed in Render View list.
Step 3. Choose Output Settings
Choose EXR as the file output type:
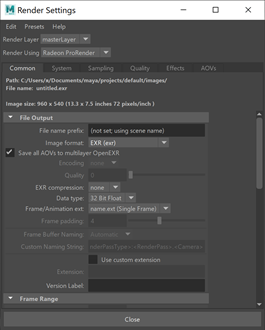
In the Render Settings window, navigate to the Common tab > File Output section.
From the Image format list, select EXR as the file type.
Select the Save all AOVs to multilayer OpenEXR check box to render all passes into a single EXR file.
With this option disabled, each render pass will be saved into a separate EXR file residing in its own subfolder named as the corresponding pass.
Step 4. Start Render
Finally, render the passes you have selected:
Initiate the production render.
For details, see Production Render.
After the production rendering is complete, open the render output in any image editing software.
You will notice that the EXR file, when opened, contains multiple layers for all the render passes you have selected. Follow your standard compositing workflow to work with the image layers.
Render Passes
AMD Radeon ProRender offers the following render passes.
Color
The Color pass renders the final beauty image, including information about the surface color, lighting, shadows and so on.
Opacity
The Opacity pass renders alpha-channel information for objects in the scene. This pass is a greyscale map with fully opaque objects shown as solid white and fully transparent objects not displayed. In-between opacity values are shown with partially transparent shades of gray.
World Coordinate
The World Coordinate pass renders objects in the scene colored in accordance with their position in the world coordinate system. RGB color values correspond to XYZ coordinates in the 3D world space.
UV
The UV pass renders texture UV coordinates using color values (red for U, green for V).
Material Index
The Material Index pass creates a mask for materials assigned to the meshes in the scene, which is useful for isolating materials in compositing. The material masks are differentiated with various colors.
Material differentiation is based on RPR Material ID values. To learn how to set these, see Assigning RPR ID Values.
Geometric Normal
The Geometric Normal pass renders normals of the actual geometry without smoothing, based on the camera angle.
Shading Normal
The Shading Normal pass renders surface normals. This pass includes smooth normals and surface attribute effects, such as bump maps.
Camera Normal
The Camera Normal pass renders surfaces based on their orientation relative to the camera. This pass provides normals in the camera space, not the world space.
Depth
The Depth pass describes how far away from the camera object surfaces are. This pass represents a depth map with a black-to-white gradient.
Object ID
The Object ID pass creates a mask for various objects in the scene, which is useful for isolating objects in compositing.
Object differentiation is based on RPR Object ID values. To learn how to set these, see Assigning RPR ID Values.
Object Group ID
Not used at the moment.
Shadow Catcher
The Shadow Catcher pass is a greyscale image representing output from objects with the RPR Shadow Catcher Material assigned. This pass isolates shadows cast by objects onto a shadow catcher surface keeping the rest of the materials non-opaque.
Reflection Catcher
The Reflection Catcher pass is a grayscale image representing output from reflection catcher objects. This pass isolates reflections cast by objects onto a reflection catcher surface, while keeping the rest of the objects transparent.
Background
The Background pass renders the environment background color or image-based environment lighting visible to the camera.
Emission
The Emission pass renders output from emissive objects with the Emissive type of the RPR Material. This pass takes into account only the emissive component of a shader, but does not include information on how it affects the lighting in the scene.
Velocity
The Velocity pass renders color-coded direction of motion for objects that change their position between the current and next frame. RGB color values used to show the direction correspond to XYZ coordinates. This pass applies only for scenes with motion blur enabled.
Direct Illumination
The Direct illumination pass renders direct lighting in the scene from all light sources and surfaces. Light bouncing off object surfaces toward other surfaces is not considered in this pass.
Indirect Illumination
The Indirect Illumination pass renders indirect light from all light sources and surfaces. This pass stores information about light bounced off object surfaces in the scene toward other surfaces.
Ambient Occlusion
The Ambient Occlusion pass renders complex interactions between inter-reflections of objects in the scene. This pass stores information on soft shadows from global illumination at mesh intersections, cracks or in corners.
Diffuse Direct
The Diffuse Direct pass renders direct light hitting diffuse surfaces. This pass considers only the first reflection off the surface, and does not store information on bounce lighting. Direct light reaching the diffuse surface is multiplied by material’s color.
Diffuse Indirect
The Diffuse Indirect pass renders indirect light bounced from diffuse surfaces. The pass takes into account lighting after more than one reflection off the surface. Bounced light reaching the surface is multiplied by material’s color.
Reflection Direct
The Reflection Direct pass renders reflections on smooth surfaces, including specular highlights and hot spots. This pass considers only the first reflection off the surface, and does not store information on bounce lighting.
Reflection Indirect
The Reflection Indirect pass renders indirect light bounced off reflective or specular surfaces. The pass takes into account lighting after more than one reflection off the surface.
Refraction
The Refraction pass renders light transmitted through refractive materials. The pass displays transparent surfaces along with reflections on them, as well as objects seen through these surfaces.
Light Group
The Light Group ID attribute can be assigned to lights, so with the corresponding AOV, this allows you to separate lighting via groups of lights. The Light Group ID passes render lighting information from light sources in particular light groups.
Subsurface/Volume
The Subsurface/Volume pass renders interaction of light with the RPR Volume Material and the Uber Shader with the Subsurface component separated from the rest of the scene.
Albedo
The Albedo pass renders pure color of the object surfaces in the scene.
Crypto Object and Material
Crypto Object and Material passes are designed to efficiently create mattes for compositing using the Cryptomatte standard. AMD Radeon ProRender offers six Cryptomatte passes - 3 Crypto Object and 3 Crypto Material passes.
Objects and materials for Crypto passes are differentiated based on their RPR ID values. To create a matte for a specific object or material, make sure its RPR ID value is set within the [0-2] range, then select a corresponding Crypto pass in the AOVs list. For example, for a material whose RPR ID is set to 0, select the Crypto Material Mat0 pass, etc.
To learn how to set RPR ID values, see Assigning RPR ID Values.
Assigning RPR ID Values
Some render passes require that you set RPR ID values to objects or materials. RPR ID values are used to differentiate items in the scene, and must be assigned before you export render passes.
Assigning Object IDs
You can set RPR ID Object values in either of the following ways:
Manually per object: display shape attributes in Maya Attribute Editor, locate the Extra Attributes section and specify an RPR Object ID value of your choice.
For all objects at once: in the Render Settings window, switch to the AOVs tab and click the Assign Object ID to all transforms button.
Assigning Material IDs
You can set RPR Material ID values in either of the following ways:
Manually per material: in Maya Hypershade, display properties of a Shading Group node, locate the Extra Attributes section and specify a Material ID value of your choice.
For all materials at once: in the Render Settings window, switch to the AOVs tab and click the Assign Material ID to supported materials button.